Configuration
Enable WireGuard
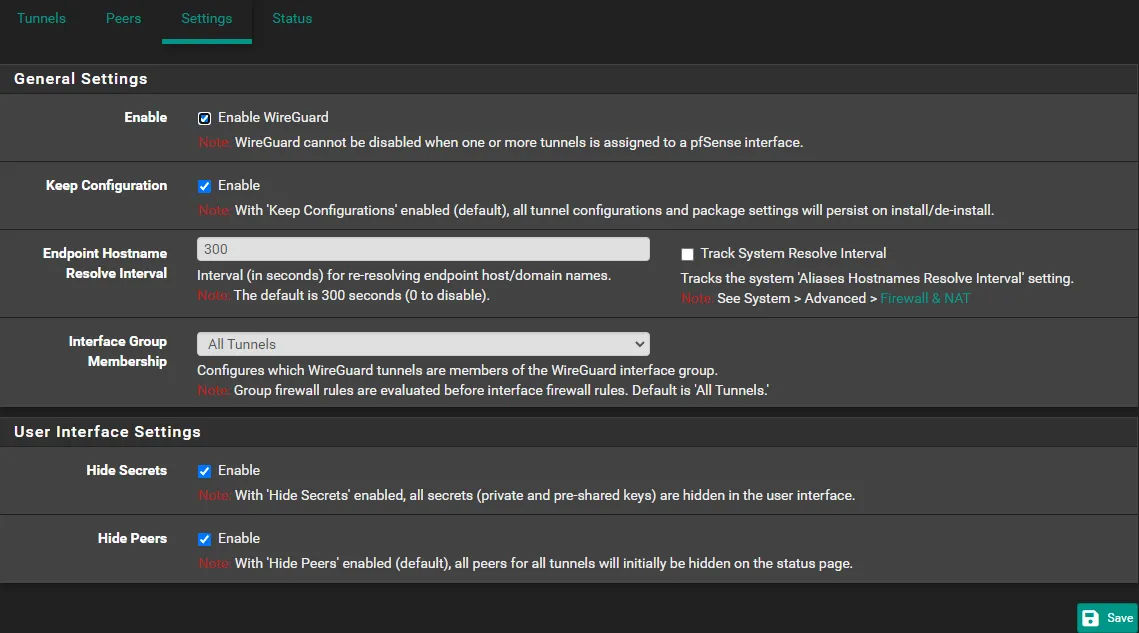
Section titled “Enable WireGuard”Navigate to VPN -> Wireguard -> Settings
- Check
Enable WireGuard - Click 💾Save
Create Firewall Rules
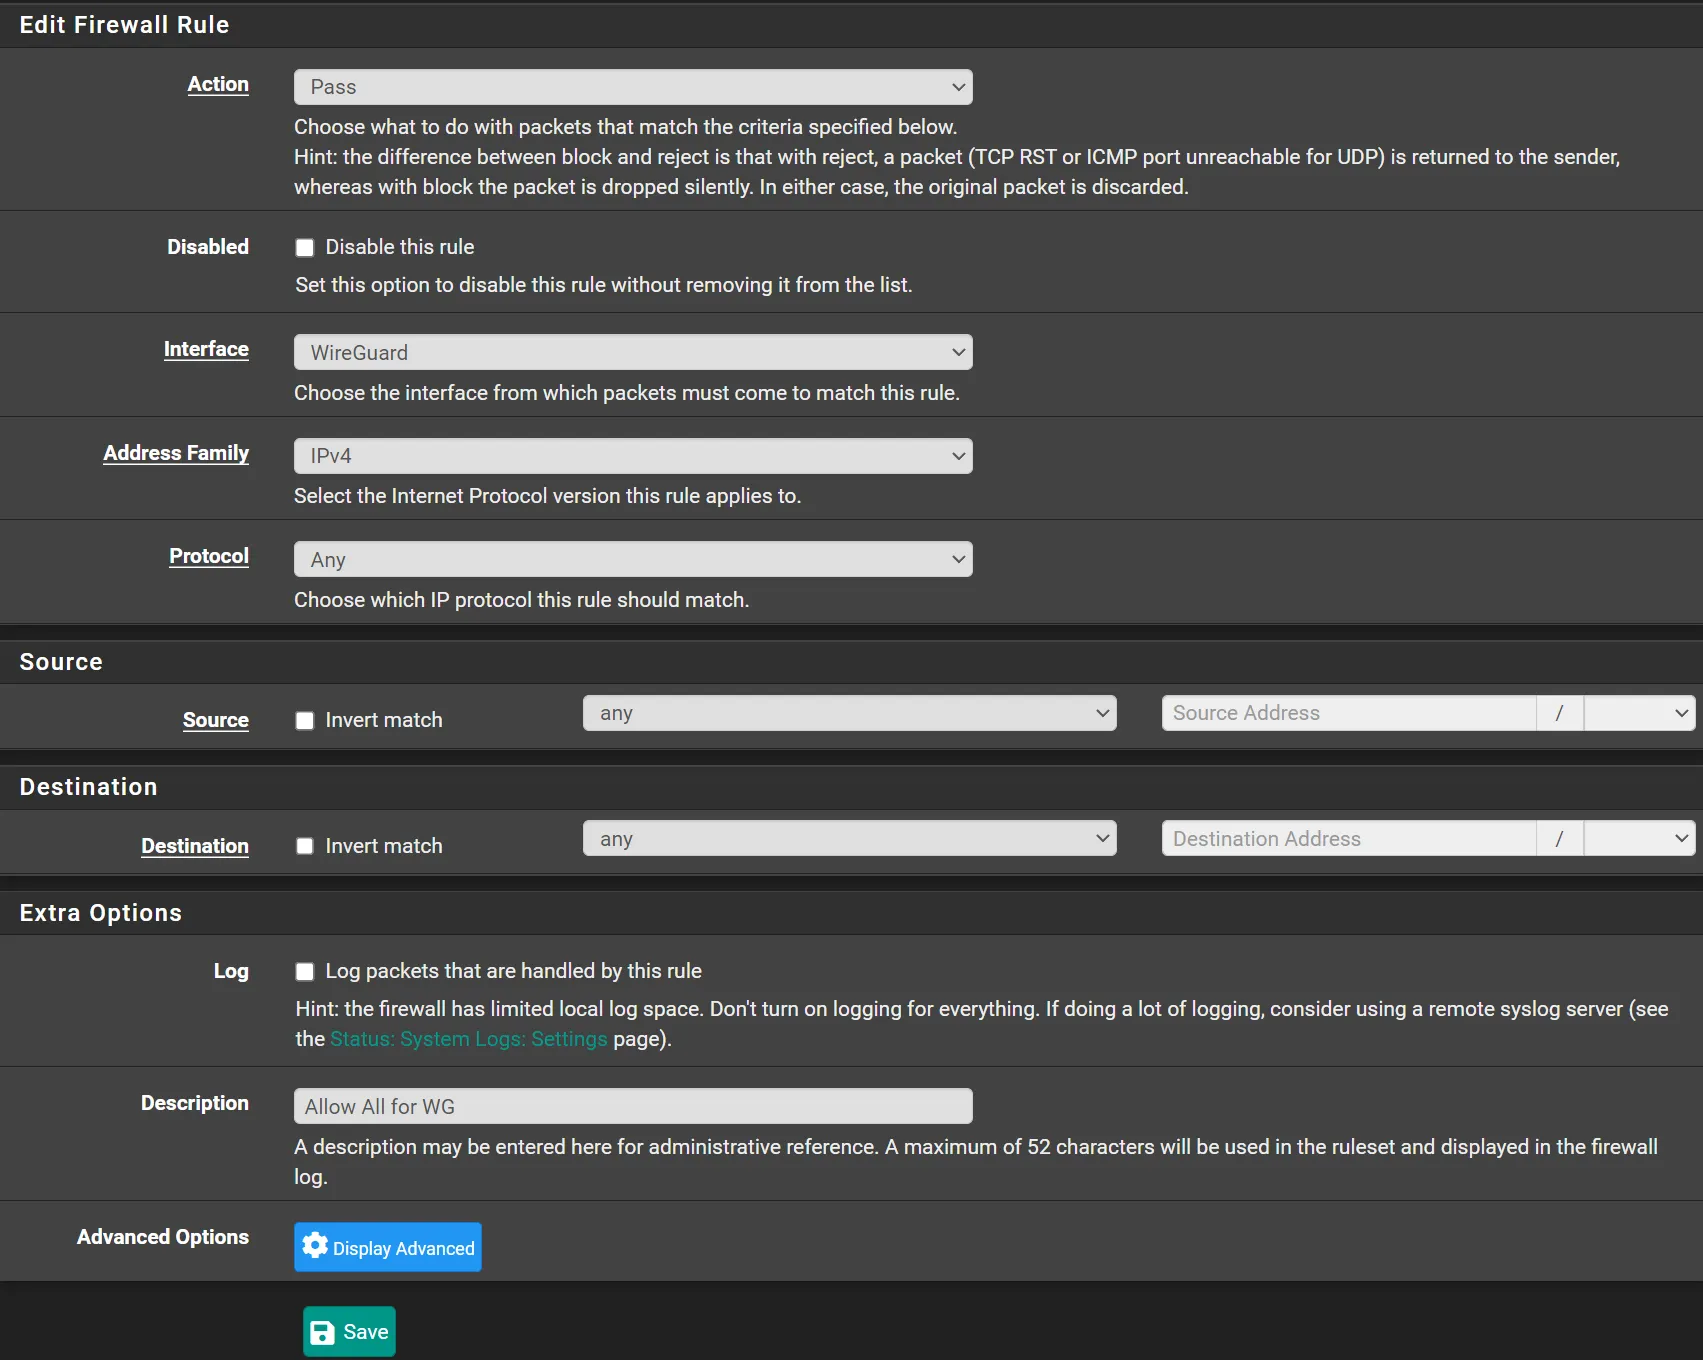
Section titled “Create Firewall Rules”Navigate to Firewall -> Rules -> WireGuard
- Click ⤴️Add
- Action:
Pass - Interface:
WireGuard - Address Family:
IPv4 - Protocol:
Any - Source:
any - Destination:
any - Description:
Allow All for WireGuard - Click 💾Save
- Click ✔️Apply Changes
This is a very open rule, just start with this and later you can apply stricter rules, if you want to.
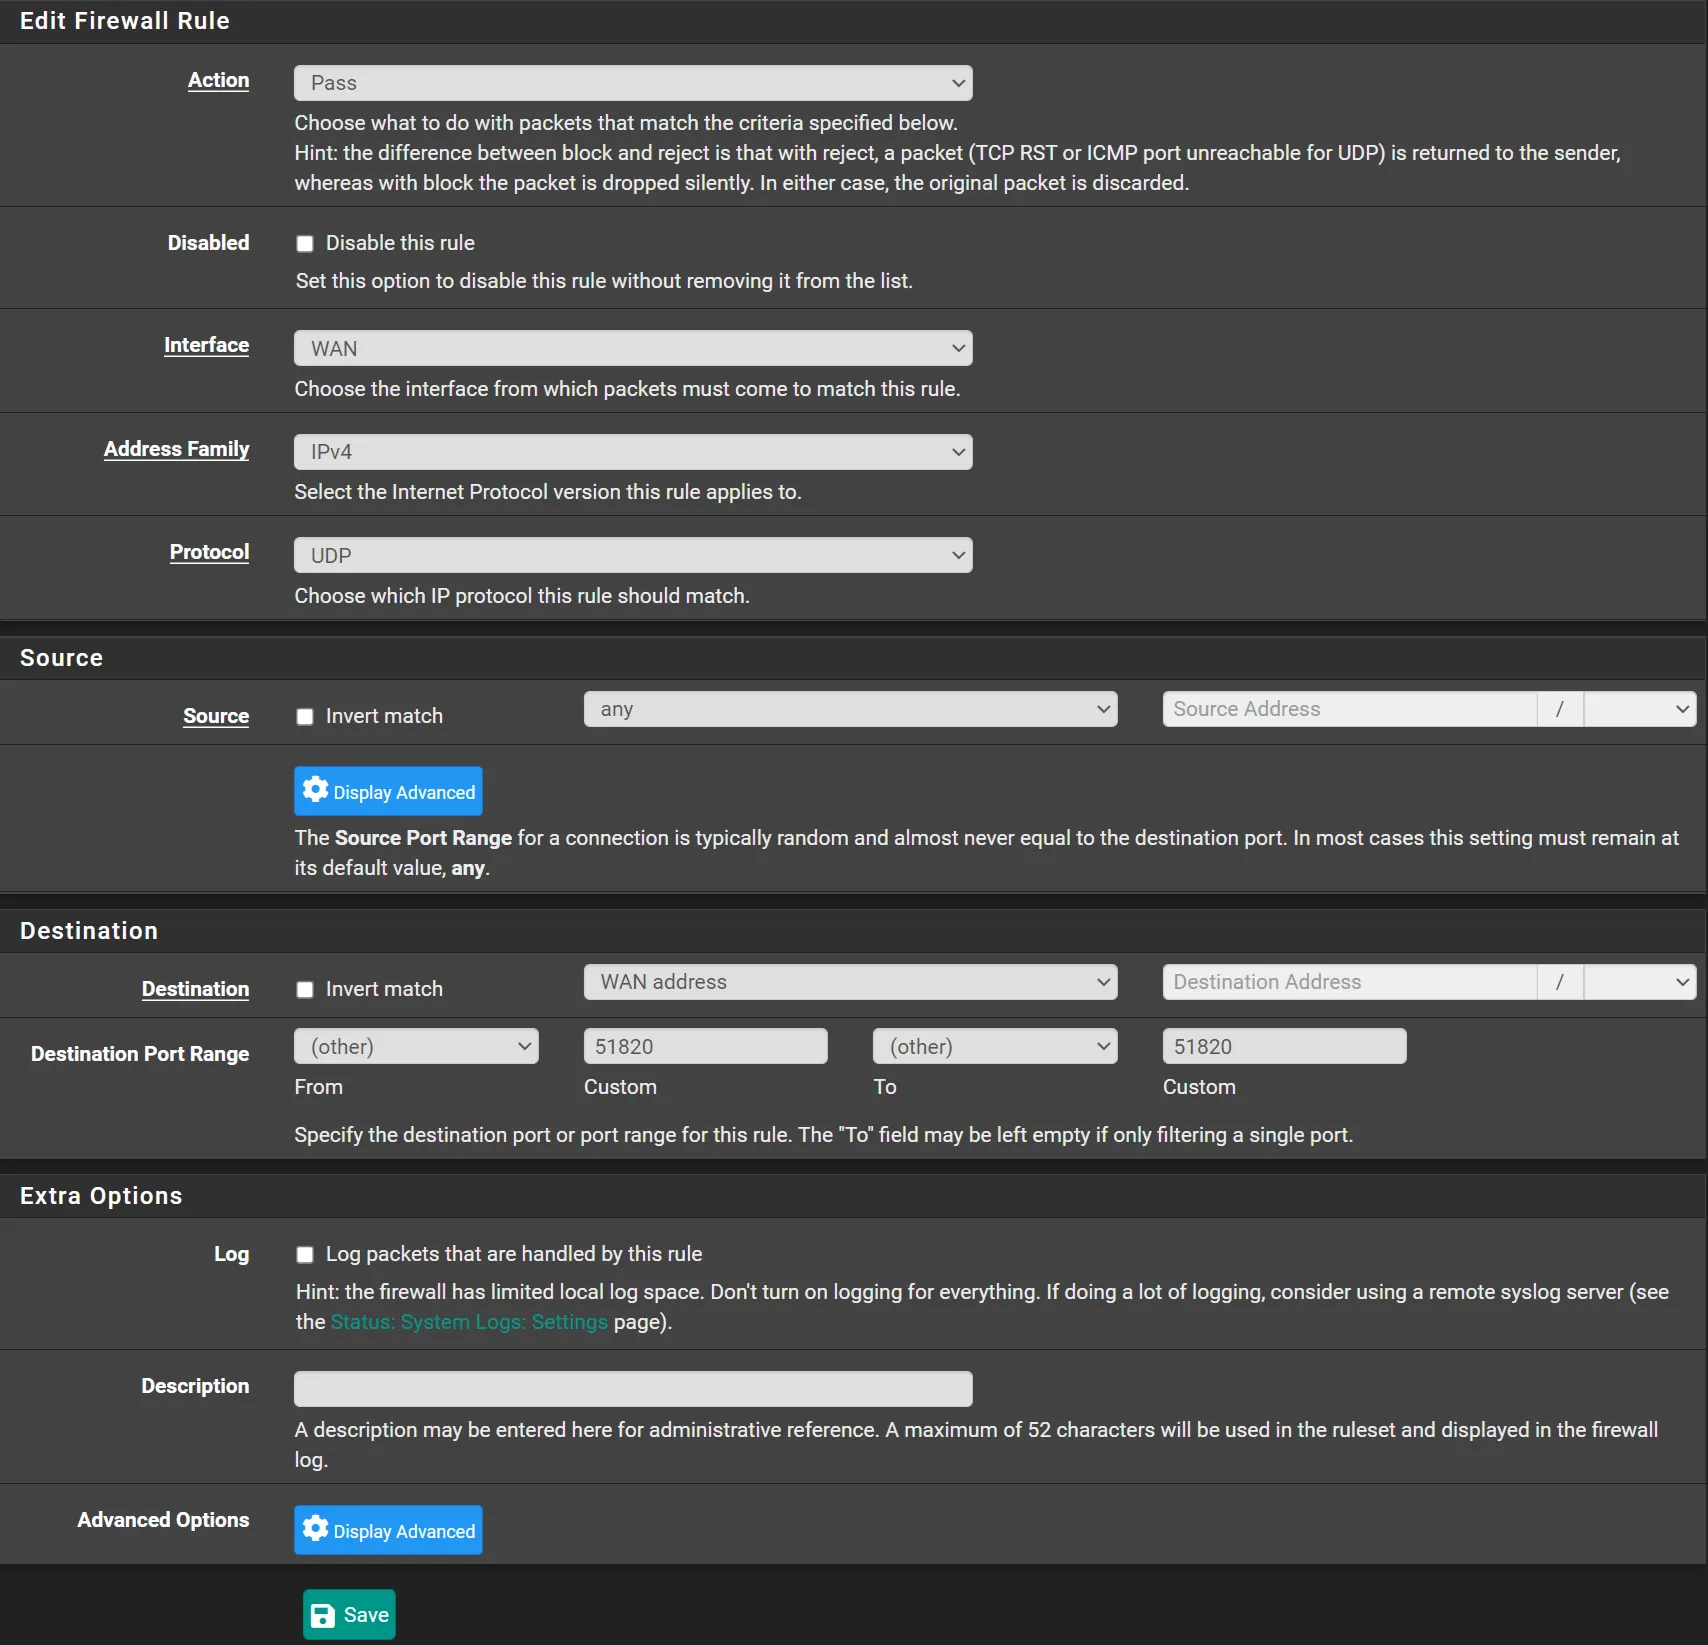
Navigate to Firewall -> Rules -> WAN
- Click ⤴️Add
- Action:
Pass - Interface:
WAN - Address Family:
IPv4 - Protocol:
UDP - Source:
any - Destination:
WAN Address - Destination Port Range:
- From:
51820 - To:
51820
- From:
- Description:
Allow WireGuard - Click 💾Save
- Click ✔️Apply Changes
Allow outbound traffic
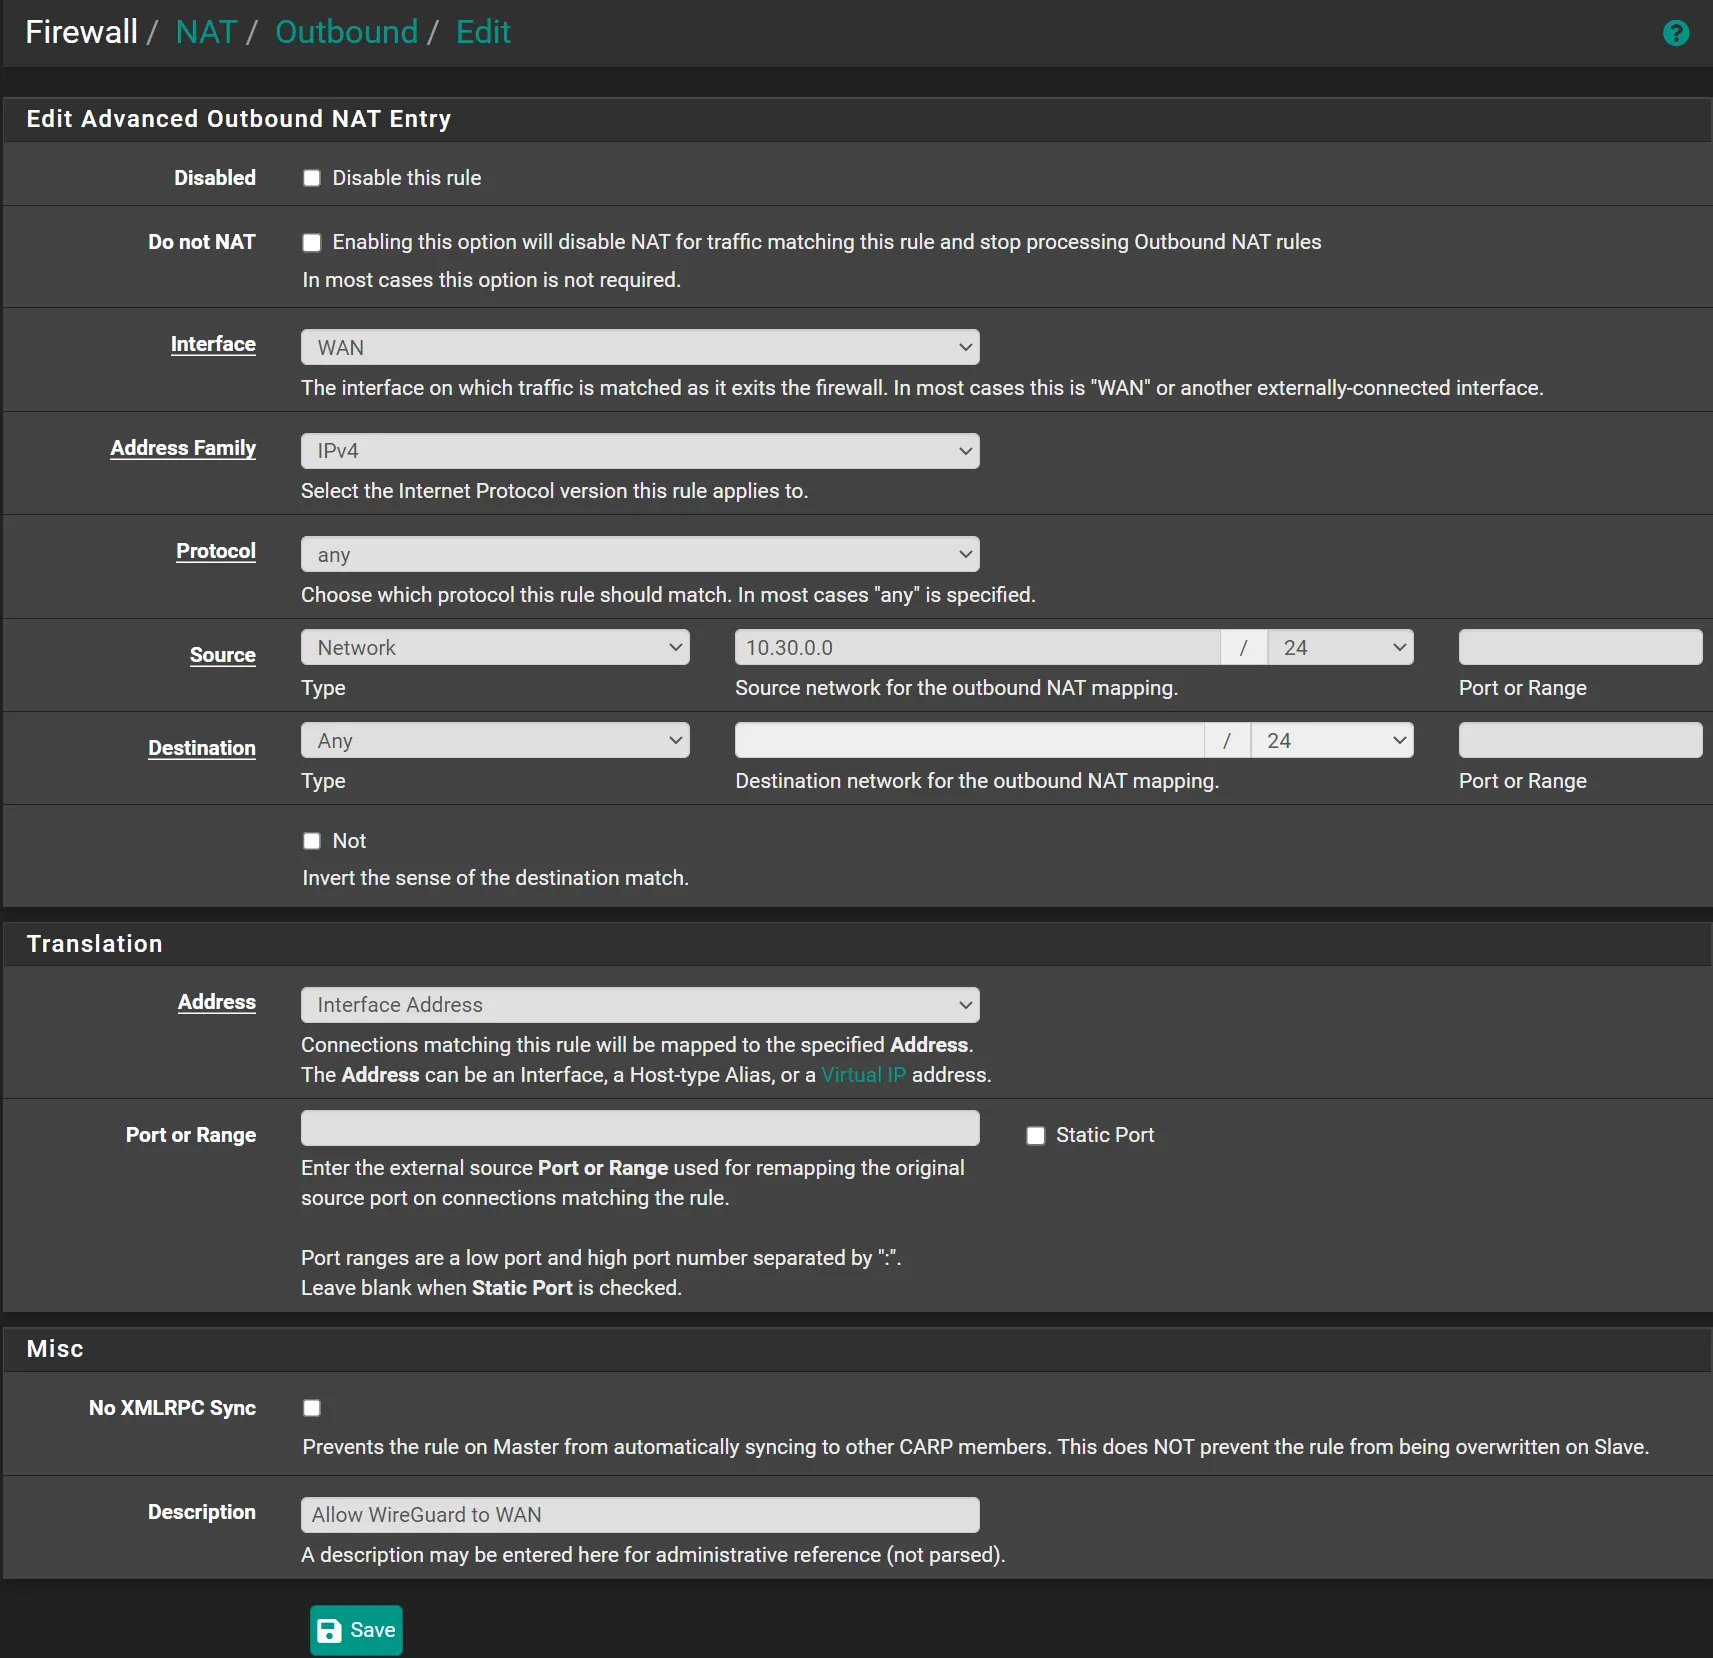
Section titled “Allow outbound traffic”This step is optional, doing this will enable your WireGuard connected devices, to tunnel all the traffic through your pfSense firewall. This is great if you use your devices on unsecure networks that you don’t trust.
Navigate to Firewall -> NAT -> Outbound
- Click
Hybrid Outbound NAT - Click 💾Save
- Click ✔️Apply Changes
- Click ⤴️Add
- Interface:
WAN - Address Family:
IPv4 - Protocol:
any - Source:
Network10.30.0.0/24(Choose a range that is not used on your network, Have to much with the tunnel) - Destination:
Any - Address:
Interface Address - Description:
Allow WireGuard to WAN - Click 💾Save Tunnel
- Click ✔️Apply Changes
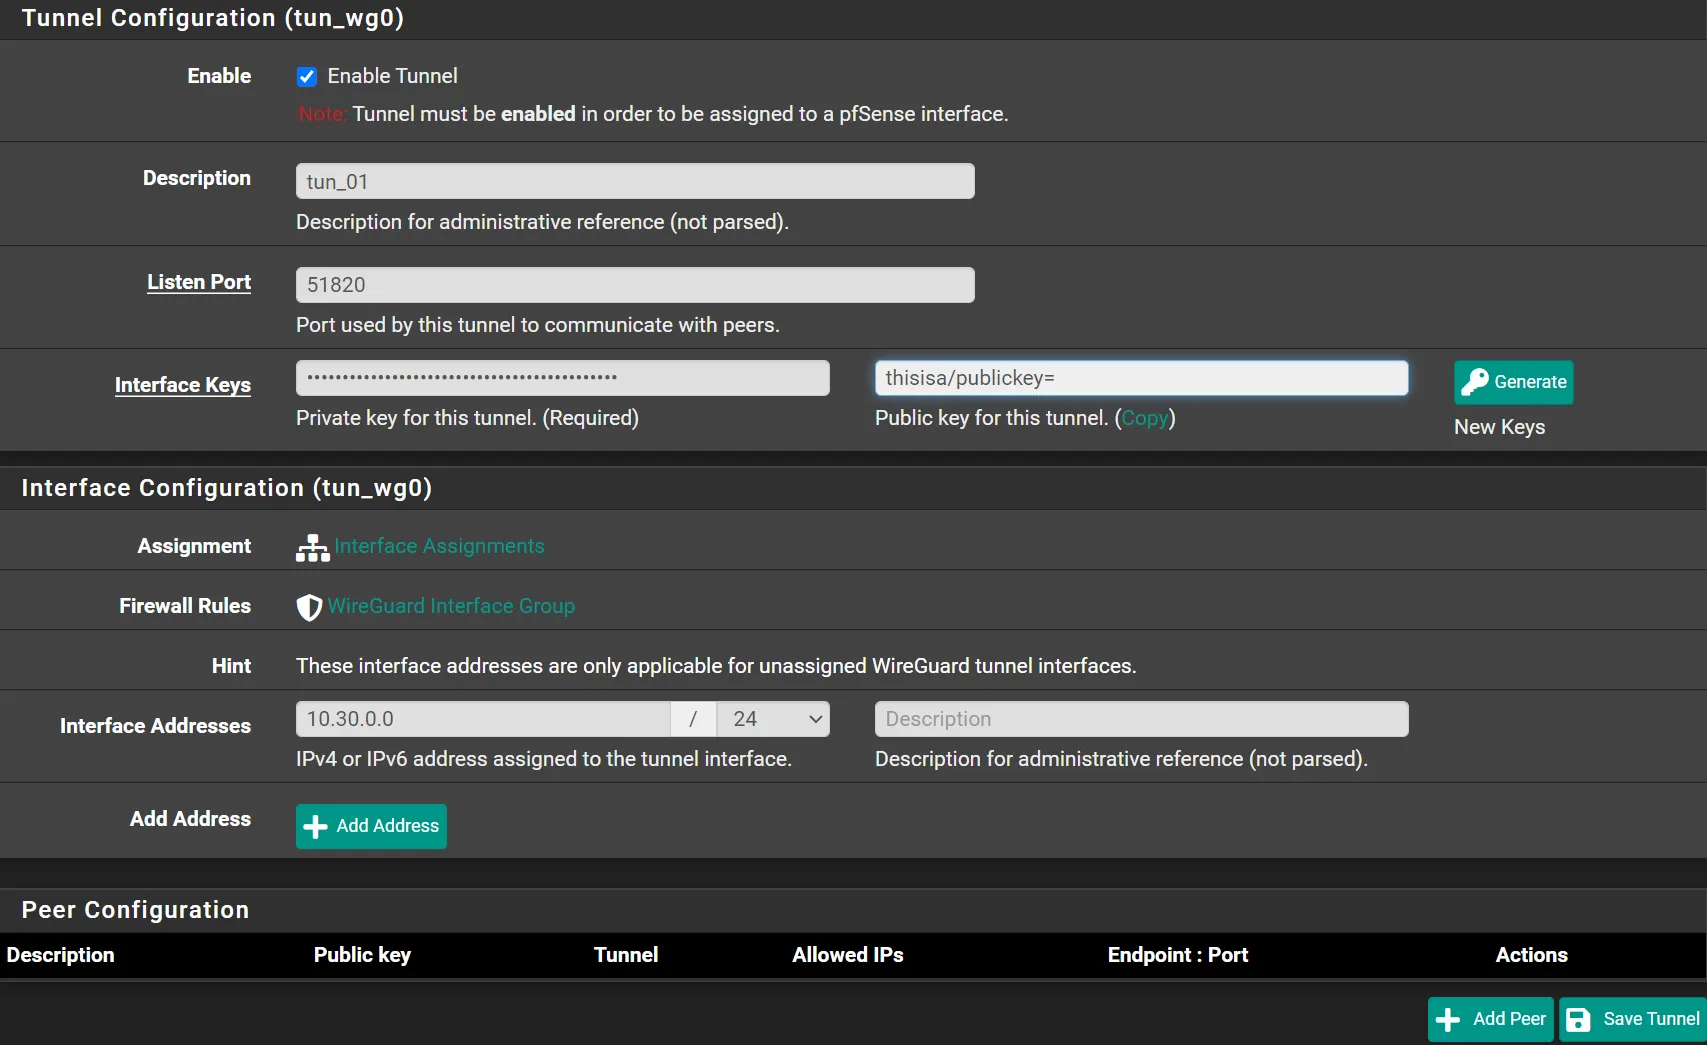
Create Tunnel
Section titled “Create Tunnel”Navigate to VPN -> WireGuard -> Tunnels
- Click ➕Add Tunnel
- Description:
tun_01 - Listen Post:
51820 - Click 🔑Generate
- Interface Address:
10.30.0.0/24(Choose a range that is not used on your network) - Click 💾Save Tunnel
- Click ✔️Apply Changes
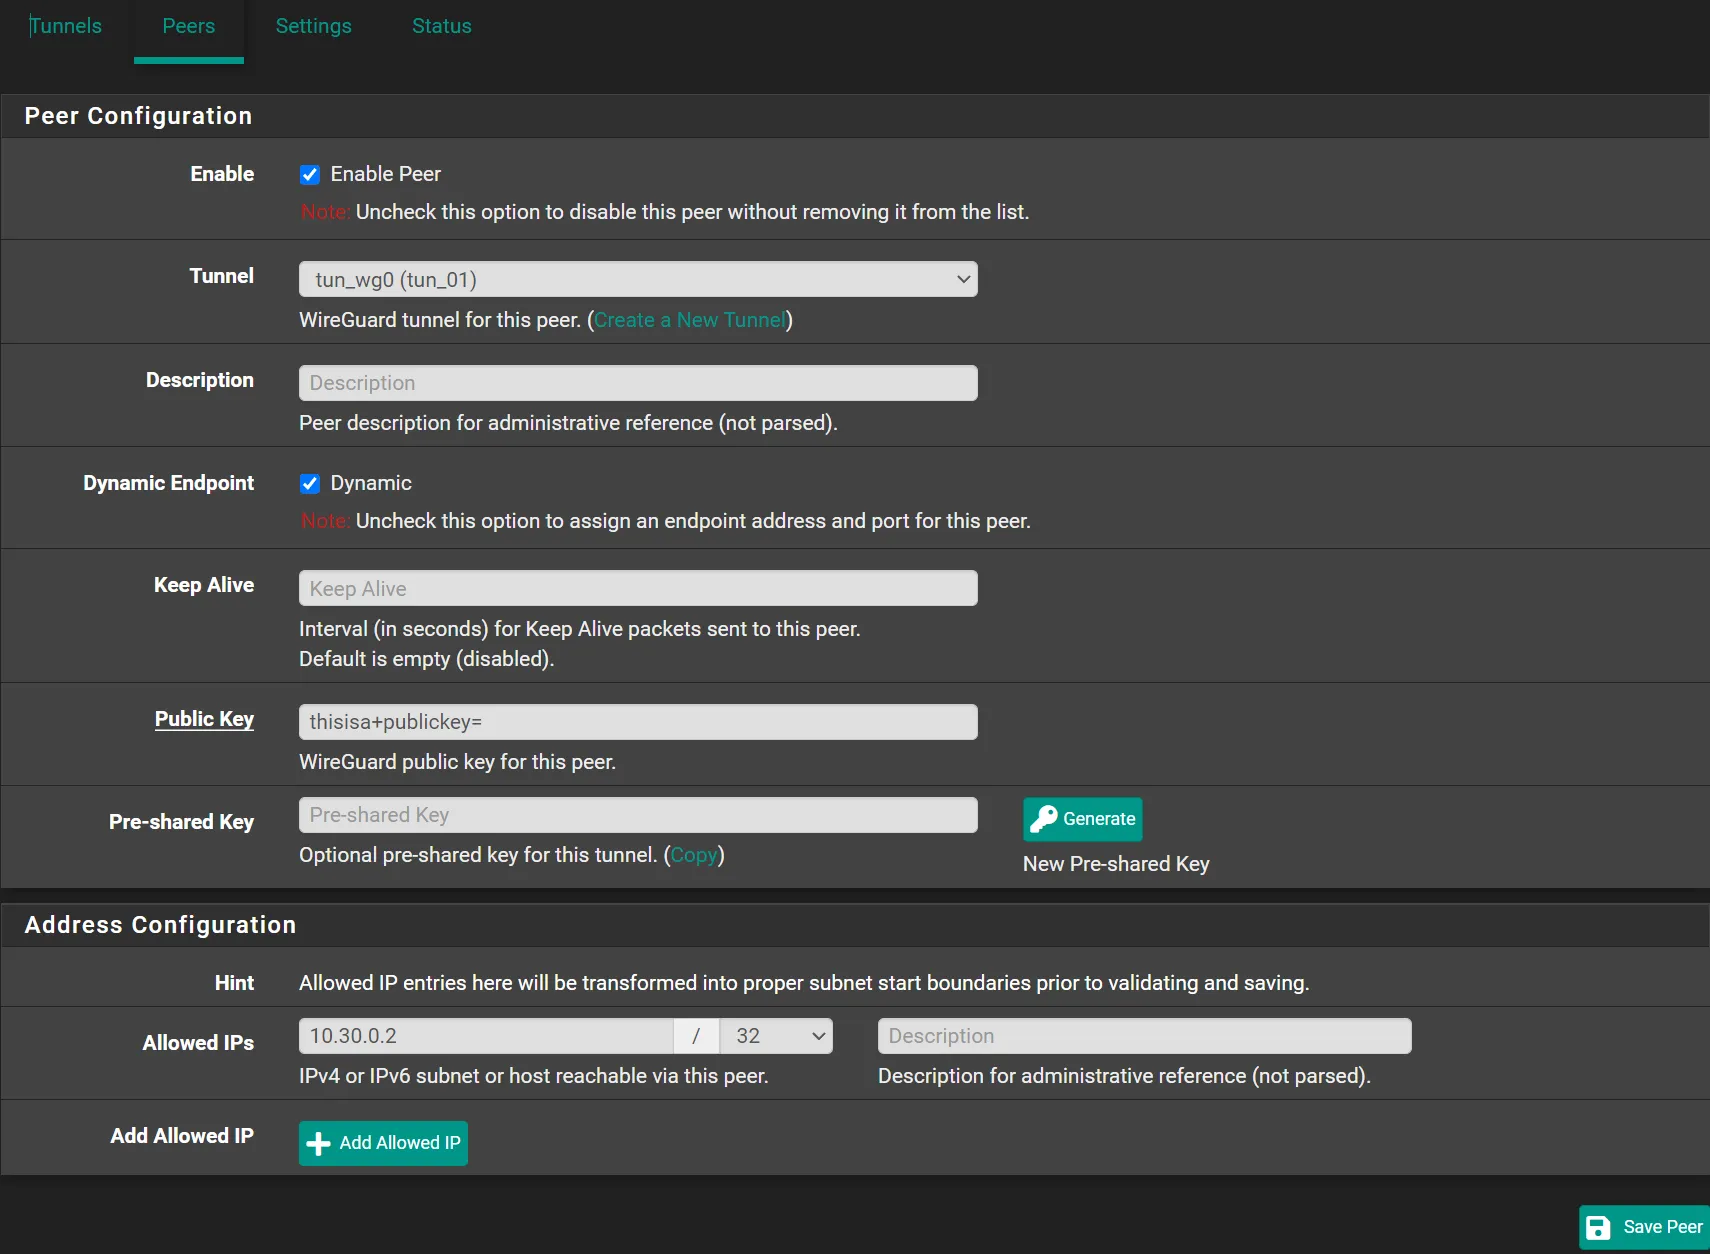
Create Peers
Section titled “Create Peers”Navigate to VPN -> WireGuard -> Peers
- Tunnel:
tun_wg0 (tun_01) - Description:
My Device - Public Key:
Your Device's Public Key - Allowed IPs:
10.30.0.2/32
Connecting peers and generating their public keys
Section titled “Connecting peers and generating their public keys”Windows
Section titled “Windows”- Open WireGuard Application
- Click ⬇️ Right of
Add Tunnel. - Click
Empty Tunnel - Copy
Public Key. Use this when creating a peer on pfSense.
Once you create th peer on pfSense, go back to Windows Application
Split Tunnel
Section titled “Split Tunnel”This will only send traffic to your pfSense when it’s destination
is in one of the AllowedIPs networks
[Interface]PrivateKey = +BTMy8yLkq/yDQYFXZW1HGs7YqCFmG+gAxxS7uhWeGA=# Put the IP you entered on Allowed IPs when creating the peer.# Note that here we use "/24" instead of "/32"Address = 10.30.0.2/24
[Peer]# This is the Public Key from your pfSense Tunnel.# Go edit your tunnel and get the public keyPublicKey = thisisa/publickey=# This is your pfSense's WAN IP (Public IP)Endpoint = vpn.domain.com:51820# Here list all the networks you want this peer to reach inside your networkAllowedIPs = 10.1.1.0/24, 10.2.2.0/24
Full Tunnel
Section titled “Full Tunnel”This will force all your traffic to go through your pfSense and then out to internet.
[Interface]PrivateKey = +BTMy8yLkq/yDQYFXZW1HGs7YqCFmG+gAxxS7uhWeGA=# Put the IP you entered on Allowed IPs when creating the peer.# Note that here we use "/24" instead of "/32"Address = 10.30.0.2/24# This is the DNS of your pfSenseDNS = 10.1.1.1
[Peer]# This is the Public Key from your pfSense Tunnel.# Go edit your tunnel and get the public keyPublicKey = thisisa/publickey=# This is your pfSense's WAN IP (Public IP)Endpoint = vpn.domain.com:51820# Here list all the networks you want this peer to reach inside your networkAllowedIPs = 0.0.0.0/0
Also check the box Block untunneled traffic (kill-switch)